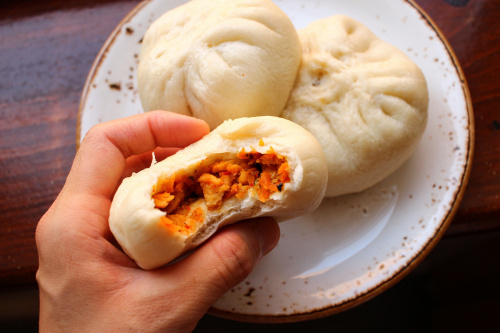
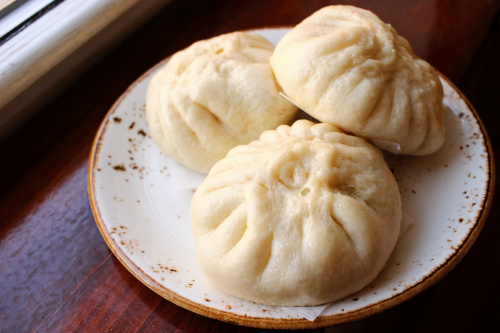
User:Michael/Pages Pending Removal/Steamed Buns (Baozi)


| Prep | Total | Yield |
|---|---|---|
| 25 Min | 4 Hr 40 Min | 12 |
Ingredients
For the dough
- 2 tbsp. cornstarch
- 6 tbsp. water
- 1 tbsp. sweetened condensed milk or honey
- 3/4 c. milk, divided
- 1 tsp. instant yeast
- 3 1/3 c. all-purpose flour
- 3/4 tsp. kosher salt
For the pork filling
- 1 1/4 c. finely shredded cabbage
- 1 tsp. kosher salt
- 1 lb. ground or minced pork
- 1/4 tsp. five spice
- 1/2 tsp. ground Szechuan peppercorns
- 1/4 tsp. ground coriander
- 1/4 tsp. ground white pepper
- 1/2 tsp. freshly ground black pepper
- 1/2 tsp. MSG (optional)
- 1/2" ginger, finely minced
- 2 cloves garlic, finely minced
- 1/4 c. finely chopped chives or green onions
- 2 tsp. low-sodium soy sauce
- 1 tsp. toasted sesame oil
For the miso carrot filling
- 2 large carrots, shredded
- 8 oz. firm tofu or fish cakes, finely diced
- 1" piece fresh ginger, grated
- 1 large clove garlic, grated
- 2 green onions, thinly sliced
- 3 tbsp. miso
- 1/2 tsp. freshly ground black pepper
- 1 tbsp. gochugaru or 1/2 tsp. ground cayenne
- 1 tbsp. toasted sesame oil
- 1 tbsp. toasted sesame seeds
For the red bean paste filling
- 1 c. dried adzuki beans, soaked overnight
- 1/2 tsp. kosher salt
- 2/3 c. granulated sugar
Dipping sauce (optional)
- 1/4 c. Chinese black vinegar
- 4 tsp. toasted sesame oil
- 1 tsp. finely minced fresh ginger (optional)
- 1/2 tsp. granulated sugar
- Pinch kosher salt
Directions
- Make the dough: In a small pot over low heat, whisk together cornstarch and water. Cook until thickened, 1 to 2 minutes. Remove from heat, add in sugar and ¼ cup milk and whisk until incorporated. Let mixture cool to a lukewarm temperature, then whisk in yeast.
- Heat remaining ½ cup milk until simmering. In a large mixing bowl using chopsticks or a fork, combine flour, salt, and hot milk until a very shaggy mixture forms. Stir in cornstarch-yeast mixture, and work dough with your hands until cohesive and no dry spots remain, about 5 minutes. Cover bowl and let dough stand for 30 minutes. Gently deflate dough and gently pick up one edge of the dough and pull lightly to fold it toward the opposite edge. Repeat this stretch and fold motion around the bowl, about 4 folds total, then flip dough upside down so that the smooth side is facing up. Let rest another 30 minutes. Repeat stretch and fold two more times, resting about 30 minutes after each fold.
- Meanwhile, make your filling of choice. Optionally, make the savory dipping sauce: Stir together all sauce ingredients in a small bowl until well combined.
- When ready to assemble buns, cut dough into 12 equal pieces. Working with one piece at a time, roll each dough into a 6” round on a lightly floured surface, rotating the dough frequently and taking care to roll edges out thinner than the center of the dough.
- Place a portioned meatball or 2 tablespoons of filling in the middle of the round, then pleat edges together. Using your thumb, middle, and index finger of your dominant hand to hold all the pleats in one spot while the other hand "feeds" the dough into the fold: gather and pinch together ¾” of dough, repeating this motion all around the edge of the round, between 12 and 15 pleats total. Gently twist counter clockwise to create a swirl pattern with your pleats, then pinch to firmly seal the pleats together.
- Fill a large pot with 2 cups of cold water, then lay a steamer basket lined on top. Cut twelve 3" squares of parchment, then place buns on prepared parchment inside the steamer, spaced about 2” apart. Let rise, uncovered, until the dough increases about 50% in size and springs back very slowly when poked, about 30 minutes to 1 hour.
- Cover the pot with a lid lined with a paper towel (to trap condensation), then turn heat to medium. Once water is up to a boil, reduce heat to low and steam buns for 10 minutes. Turn off heat and let stand with lid on for 5 minutes more. Remove the lid and let buns cool until safe to touch.
- Serve with dipping sauce, if desired.
For the pork filling
- In a large bowl, toss cabbage with salt until well combined. Let sit for 10 minutes.
- Add all remaining pork filling ingredients and stir mixture in one direction until a smooth paste forms.
- On a plate or tray lined with parchment, portion mixture into 12 meatballs and transfer to the freezer t0 chill for 30 minutes, until semi-firm.
For the miso carrot filling
- In a large bowl, stir all ingredients together until well-combined.
- Transfer to the refrigerator and chill while dough is resting.
For the red bean filling
- Rinse and drain soaked beans. In a medium pot over medium heat, combine beans with 2 cups water and salt and bring to a boil. Lower heat to a simmer and let cook until beans are tender and begin to split, about 30 minutes. Drain and reserve cooking liquid.
- Return pot with beans to medium-low heat. Add in sugar and enough cooking liquid to barely cover the beans (about ½ to ⅔ cup) and let simmer until beans are completely creamy and most of the liquid has been absorbed, about 15 minutes. Using a wooden spoon or potato masher, mash beans until desired consistency is reached.
- Let cool completely before using.
Notes
On yeast and flour Once upon a time in the olden days, like most traditional bread recipes, Chinese steamed buns were made with sourdough preferments. To keep the flavor consistent and the process a little more convenient for our modern-day lifestyles, I've chosen to use commercial dry yeast in this version. You can use active dry or instant yeast interchangeably for this recipe.
Many Chinese steamed buns use a specific type of low-protein all-purpose flour that can be hard to find in many parts of the U.S. To approximate the texture that kind of flour achieves, we will be using two techniques. First, to keep the bun texture fluffy but not dry and powdery, take a minute to make a water roux with cornstarch. Similar to a tangzhong starter that's commonly used in milk bread recipes, this lightly-heated gelatinized mix will add a light bounce and desirable tackiness to your bun.
The second technique is to use boiling liquid in the dough to create a more tender steamed bun with just the right amount of chew. Heat a portion of milk to a simmer (microwave or stovetop are both fine) and stir it into the flour before adding in the remaining milk and bloomed yeast mixture—the hot milk will partially set and tame the gluten network in the dough to limit toughness.
Hand-mixed vs. stand-mixer dough
If working by hand, to avoid burning out your arms and worsening your carpal tunnel syndrome, bring the dough together and knead just until it forms a cohesive dough with no dry pockets. It might not be smooth right away—that's okay. Cover the bowl and return to it 30 minutes later, and you'll find that it has relaxed and become easier to knead. From here, work the dough by gently folding the edges into the center, similar to the stretch and fold technique used in our sourdough bread and whole wheat bread recipes. Return to the dough and repeat this quick fold two more times and your dough should be ready to go.
While I prefer to observe and feel the dough change underneath my hands during the kneading process (it's quite meditative and therapeutic!), you can also use a stand-mixer to get the job done. If you don't feel like returning to the dough periodically over 2 hours, let the mixer go until the dough is pretty smooth—anywhere from 5 to 15 minutes, depending on your mixer speed—then cover the bowl, step away, and let the dough rise until it's nearly doubled in size.
To pleat or not to pleat
For a classic savory steamed bun look, you're going to want to pleat these buns. Truth be told, it's a bit difficult to get the hang of it as a beginner! As with all things, practice makes perfect. The key is to roll out your portion dough so that the center of each round is thicker than the edges: Thinner edges are easier to fold and pinch. Use one hand to fold and hold the pleats in place while the other supports the bottom of the bun and continuously pushes the filling into the dough to ensure enclosure.
But there's absolutely no rule that states you have to pleat your steamed buns! If the idea of messily pleated buns give you the kind of anxiety I experienced while making these, you can forgo the pleat attempt and simply cinch the edges together, flip the bun upside down so that the seams are on the bottom. Give the bun a gentle tuck and roll on your work surface to seal completely.
How to steam your buns
You can use a metal steamer basket that fits inside a deep pot, or traditional bamboo steamers. To ensure a non-stick release, place your buns on top of 3" squares of parchment paper before setting them inside your steamer. They will double in size during proofing and cooking, so make sure there's at least 2" of space between each bun.
There are a few things to keep in mind to adjust the bun's texture to your liking. To develop a shiny, chewy skin on your bun, let the buns proof uncovered. This exposure to air will let the surface dough dry out and harden slightly, giving it that characteristic texture. For a fluffier bun, let the dough proof longer, about 1 hour. For a chewier, denser bun, shorten the proof time to about 30 minutes.
Gradual heating and cooling will yield a smoother surface on your buns and ensure a more evenly cooked bun. Start the steaming process with cold water: Fill your pot with about 2 cups of cold water, ensuring that the surface of the water has at least 2" clearance from the bottom of the steamer basket. Cover your steamer, then turn the heat on, and once the water is up to a boil, lower your heat to a medium-low. Steam for 10 minutes, then turn off the heat—but keep the lid on for 5 more minutes! Uncovering right away will shock the buns with cold air, which will make them shrink and wrinkle the skin.
These buns can be kept in the fridge for up to 3 days or frozen in an airtight bag once cool for longer storage. To reheat, re-steam in a steamer basket, or in the microwave alongside a separate bowl of hot water (to simulate a steam environment).